[go: up one dir, main page]

Showing posts with label Urban buildings. Show all posts

Wednesday, June 3, 2020

1/600ish Block Apartments

I got these plastic models done. As I think I mentioned previously, they are from AliExpress. They are not specifically 1/600, but they are close enough


I painted them in a color scheme that I saw on several visits to China. They tend to paint the bottom-third of many buildings a different color from the rest of the building. I did three colors that didn't look overly flashy. I thought about giving them a wash, but decided they looked ok without. There was nothing behind the windows, so I took some black construction paper and glued it to the inside walls. Their bases are cut from styrene For Sale signs, painted and flocked. In China, you would see rows and rows of these buildings. I think for my purposes, three are enough.

Wednesday, April 15, 2020

1/600 Buildings from China

Back in early January, I stumbled across a bunch of modelling supplies on AliExpress. AliExpress is an online shopping site in China that I guess is connected to Alibaba, though I am really not clear why or how they are different. They are both Chinese versions of Amazon.com, but everything comes directly from the manufacturer. Two other differences from Amazon.com are that they don't seem to sell books and it takes FOREVER for the stuff to get here. The first time I ordered from AliExpress, which was some dice, it took almost a year for them to ship. This time, it was about three months. And regarding what they sell, if you don't know, or are too young to remember, Amazon.com started off selling books before they got into everything else.
I had the fear in the back of my mind that the packages were dripping with Corona virus. I'm going to assume that they are not contaminated, or if there were any virus particles on them, they did not survive the trip. I sprayed everything with some disinfectant anyway.

I got these buildings. They didn't have a scale assigned to them, but the dimensions seemed like they were roughly 1/600. I ordered a few just to see what they looked like. I have yet to paint them. You be the judge.


These two appear to be small office buildings. They don't seem to have entry ways. The windows on the ground floor almost touch the ground. I assume the small structure on the roof is a stair access.


I bought three of these. They look a lot like large Soviet style, high rise apartment blocks. These apartment complexes are still very much around today throughout cities in China. Many of my in-laws live in such buildings. Like the previous buildings, there doesn't seem to be any doors. At first, I thought the two towers might be for elevators, but they have windows. I might make them into elevator shafts by covering over the windows. I'm not all that certain which is the front and which is the back.

They are very stylistic, and that is OK. I'm going to leave the windows they way they are rather than put clear plastic behind them, or maybe glue black paper behind them. I might buy some more, if I can find them on AliExpress again. UPDATE: Here is the link, and they cost about US$3.00 excluding shipping.

Wednesday, October 3, 2018

1/600 Paper Building

I've been trying to make some quick and dirty building for my 1/600 moderns. Here is a paper building I made recently. It is a "proof-of-concept" prototype model to see how I can make them with an arcade. Its pretty simplistic, but I am pretty happy with it and can easily scale it up to 1/300. I have access to Adobe Illustrator, so I can make modifications pretty quickly. The arched openings of the arcade would probably be smoother if I had one of those computer stencil cutters, but for such a small scale, I am not going to be too picky.

Initial build before I added the roof and base.An
Oddzial Osmy BTR-60 is parked outside.

Roof and base added, then quickly painted. The
windows were inked in with a Sharpie pen.

Here is what it looks like next to a 1/285 building, which is a
Mediterranean villa from Gamecraft Miniatures

Monday, February 15, 2016

Early Buildings for Microarmor

I was digging through some old storage bins and found these buildings that I  made back in the 70s for WWII games. They were cut out of blocks of scrap wood. Crude and not all to scale, but did the job back then.


Friday, June 12, 2015

Dirt Road Gas Station


I'm still sort of burnt out from making dirt roads, but still haven't jumped into the water and started making rivers. So, I made a few curves (bor-ing!), and a little roadside scene: a gas station.


The station and its roof were made from a block of Polymer clay. For the roof, I flattened out some clay and then pressed it onto the bottom of the small metal mitre box. The bottom is corrugated, and seemed to be of the right scale. I peeled the clay up and then baked. I was pretty happy with the effect. The main body of the station was roughly cut out of clay and the door and windows gouged out.

The gas pumps, the little tank on the side of the building, and the sign were made out of styrene plastic. The word GAS on the sign is not centered; I should not have used superglue to attach it. Its probably hard to tell, but on the other side of the building I have two metal drums from Heroics & Ros against the wall and a tire that I made out of a styrene tube, which was a lot more work than it was worth.

The station is mounted on a sheet of styrene that was covered over with latex caulk. The roadside scene is to connect up with the other road pieces.

This going to be the last road piece for awhile. I want to get started on my rivers.

Monday, March 10, 2014

Sci-Fi Building from Paper Mache Packaging


I started this project back in November, and now finally I am finally finished. I was going to do a series of work-in-progress posts, but then decided to post it all at once. I thought I had took some pictures of my progress from the very beginning, but I can't to find their files, or maybe I thought I had took them, but didn't.

We seem to keep a lot of those paper mache packing containers. I am not sure why we do. I blame my wife, who can't seem to throw anything out. I don't really know what they are officially called, but those are the things that a lot of electronic devices are stuck into to keep them from banging around and getting damaged. The one I picked jumped out at me as a good candidate. It looked like a dwelling or research station made of some sort of earthen structure such as adobe. Maybe its a homestead on a backwater planet.

Prepping the Container
I sealed the container, both the exterior (the side that will be seen) and the interior, with Mod Podge. I suppose I could have used watered down PVC glue but I wanted to bring out my Inner Hippie. Plus, its fairly cheap and is consistent in viscosity. It never warped the paper mache, made it stronger, and sealed it up nicely for later painting.

Making a Base
I bought some cheap, thin, acrylic sheets at Lowes and cut a base. I cut it to size so it just fit the container. I then sanded it so that glue would take to it. The container was strong enough that I didn't need to fill it with water putty like I had done with the previous sci-fi dwelling I made. I glued the container to the base with some superglue gel.

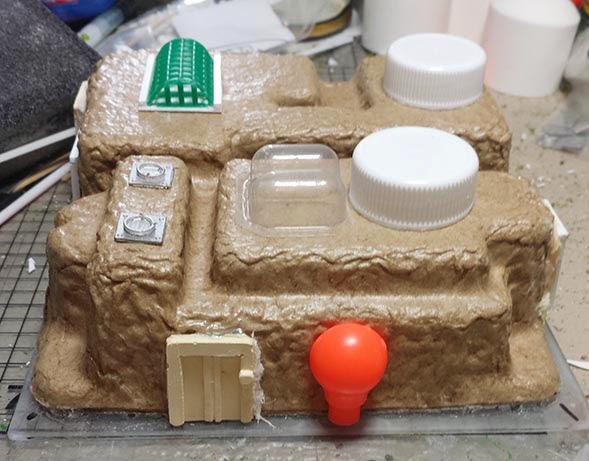
Adding the Windows, Doors and Decorative Do-Dads
I used the mold for my previous sci-fi building to make more doors. The windows were made from piece of plastic embroidery mesh. This time, I used square styrene strips to frame the windows. They looked a lot nicer.

Front of building before painting
 I really wanted a skylight, but didn't want to just put another flat, framed window on the roof.  Embroidery mesh is a pretty soft plastic--a lot like 1/72 scale plastic miniatures. I cut out a piece and kept bending it to a point were it would not flex back all the way into its original flattened state. I built a frame out of styrene and fit the mesh into the frame. The natural tendency of wanting to go back to a more flat shape make it lock into the frame and was held there by adding superglue. The sides were kind of tricky. They don't look that nice, but they will do.

Close up of skylight
I then added a bunch of do-dads. I added some vents from The Source, some soda bottle caps for air conditioning units, and one or two other items to decrease the empty spaces around the structure.

Back of building
Due to the folds and crenulations on the surface of the container, some of the doors and windows had really obvious gaps between them and the walls. I filled them in using glue-soaked tissue paper.The last thing I did before painting it was to put some acrylic pumice texture gel on the small part of the base that was exposed. I thought about leaving it as is, but it was already frosted.


Painting
I primed it with gesso. I don't like using gesso on figures, but I figured it would work well on a building like this. Plus I have a huge bottle of the stuff and I don't want to waste it.


 Thinking about it, I could have left the structure unpainted in is natural color, which was a light brown, but I was not sure what color I wanted it to be. Well, I ended up painted it a light brown that pretty much matched its original color! I then washed the whole thing in my patented wash of Future floor wax (or whatever its now called) and black india ink. To reduce the shine, I then finished it with a clear flat.


 The last step was to add a little extra touch to the skylight: glass. I made the glass of the skylight using this stuff from Testors that is for gluing canopies to aircraft models.


Applying Testors glass making glue to the skylight with brush

Finished Building
Overall, I'm pretty happy with it. The front door and two of the windows look a little wonky, but its fine for gaming purposes. After I had put in a number of windows, it seemed to need two more. Being lazy, I made another mold using one of the windows that was already glued to the building. It turned out OK, but didn't have the depth that the actual embroidery mesh had. 

Front

Right side

Left side and rear

A Grey Alien pays a call


Friday, August 10, 2012

15mm Sci-Fi Small Dwelling

I slapped together a small dwelling for my sci-fi adventures in Yogurt Town.


I used the container from a Kraft Foods Lunchable. It is made from styrene, so plastic modelling glue works well on it. One lunchable will give about three separate containers once you cut them out. The door was cast from Durham's Water Putty and featured in a  previous post. The air conditioning unit, or whatever it is on the roof is a juice bottle lid. I made the poorly-squared window by cutting out the frame from sheet styrene and then inserting a piece of plastic embroidery mesh for the bars of the window. I couldn't decide what to paint the dwelling, so I just did it in grey. I have not decided on whether or not to base it. One thing about the lunchable container is that its walls are very thin. It is easy to move around on the gaming table, and anything you glue on it may pop off if the walls are flexed. So before I started on the outside, I filled the container with Durham's Water Putty. It took a few days because I did it in layers. To reduce the amount of putty I needed, I waded up some aluminum foil into a ball and stuck it in before filling it up with the putty. When dried, the walls no longer flexed and it is heavy enough to stay put on the gaming table.

Wednesday, September 21, 2011

A Fun Idea

Last night my daughter and I read the Dr. Seuss book, McElligot's Pool. I vaguely remember reading it. Not one his best, but not bad. Anyway, what do I spot? Some of the Good Doctor's crazy architecture! I've thinking of building some structures for 15mm sci-fi games. I'm not sure about the style, and I don't want a village made solely out of yogurt containers. Why not have buildings that are as wildly imaginative as Dr. Seuss's? I need someone who doesn't have any preconceived notions of what a building on another planet should look like. The person just builds them however he wants. Who best to this task? My daughter, that's who! This weekend is supposed to be rainy. She has a swim meet in the morning, but after that, she will be itching for something to do. She likes doing what she calls "projects" while I work on my minis. Usually, she makes jewelry out of polymer clay, but she has constructed a model of the solar system and recently she made me an one-eyed space alien also using polymer clay. I think I can coax her into constructing a couple of buildings. I'll leave it up to her s to what she wants to build and what she want to use to build them. The only criterion is that they be 1/100 in scale, or at least don't look out of place when a 15mm figure is standing next to them. I'm sure she can come up with something. My only concern is that she will get bored and quite the project before it is completed. I'll give it a try and post the results.

Monday, August 8, 2011

Places for a Late Night Snack

All over the streets of Mexico City you will see small snack bars or kiosks. They range from just a thrown up tent, to a small shack. I have not seen too many mobile ones like you do in the USA.

In addition to painting up yatai lunch cart, I built a more permanent structure. It sort of reminds me of something you'd see on a beach selling burgers and hotdogs.

Yatai Food Cart

Snack Shack

The snack shack took all of a few hours to build, and only because the glue had to dry. Forgive me if my Spanish is off. I used a translating program. I was very tempted to try and make a menu board running along the top, but I decided not to press my luck. No snack shack would be complete without some sort of beverage advertisement. Its probably hard to tell the name of the drink, but its a sign for Dr. Enuf. Dr. Enuf is a local soda found in east Tennessee. It can be best described as a sort of a mild lemon-lime soda with a certain "Je ne sais quoi" herbal flavor to it. My daughter and I have grown to like it and always get a bottle when at the farmers market, so I thought it would be a major drink found on the continent of Gambusia.

Sunday, July 24, 2011

Greetings from Mexico!

This doesn't have anything to do with miniatures and gaming, but I am presently in Mexico. The city of Pachuca, to be exact. Business or pleasure, you ask? Well, considering that I am here to do research, I guess both. My research is part of my business and is still (though, sometimes a struggle) my pleasure. I've been coming here to the university and to do field work almost annually, for the past 9 years. Usually I come for two weeks, but for a number of reasons, one of them being budgetary, I could only manage one week.

Sorry, no pictures yet, I just arrived. One thing that I hope to do that is mini-related, is to get lots of pictures of various shops and building for ideas for for constructing new 1/300 buildings. I wanted to get some in Mexico City where I landed, but my camera was packed with my baggage in the trunk of my colleague's car. Plus, I was rather zoned-out from the flight (I still am).

Hopefully, I will collect a lot of data for my research, and get some good shots of interesting and useful architecture.

Saturday, November 13, 2010

Your Ad Here

Mexico City is a really cool city. Its huge, and has a lot of things to do and see there. I've gone there several times while doing research in Mexico. What is not cool about it, besides its high crime rate (but what city doesn't?) is all the ads and billboards. I don't think there is a single building that doesn't have some sort of advertisement on it. So, I thought, any city or large town worth its salt on the Gambusian mini-continents should have ads on their buildings. So, here is my first very modest attempt:


A few new "innovations" with this building. I wanted it to be commerical, so I made some large shop doors. Yes, they looked uneven, but I blame it on the thin cardstock I was using. Also, I forgot to darken the interiors of the shops. These aren't innovations. First, I made the balcony railings out of window screen. Its easy to cut out, but difficult to glue down to the balcony. I found that if I put a tiny strip of cardstock at the bottom of screen, it glues better and is a little studier. You can see the difference between the first verses the second and third floors. The second innovation was with the windows. It sort of a pain to make them out of polymer clay, its somewhat limiting as to what you can do, you can't get them squared up very well, and they are disproportionally thick. So, I used this mesh screen that is used for knitting or something. It is made out of soft plastic, and comes in two sizes (at least as far as I know). I used my sprue-cutters to cut out windows. They are great because you can make various sized windows. The only drawback to them is that you really have to get in there with the sprue-cutter to get a flush cut otherwise you get little nubbins sticking out where you cut. The next time I used them, I will also glue them first on a paper backing for painting purposes. Here is what the building looks like on the side:

I took an ad out of some Chinese movie catalog and scanned it under a really high resolution. Then I shrank it down and swapped out the Chinese for Spanish. The Chinese is translated into Spanish, so the ad is still legit. My printer didn't do such a hot job at the edges of the text for some reason, but that is OK. You could say the ad has been there for awhile and has faded a little. I plan to get a little more creative in the future with my ads.

Wednesday, September 23, 2009

Building the Zwieback Motel Part 1

I gotta say that my favorite books as a child were those of Dr. Seuss (Theodor Seuss Geisel). I loved everything about them. In addition to the stories and the characters, were the fantastic contraptions and architecture of this strange and wonderful universe. One of the joys of being a parent is that I get to re-read all of my old Dr. Seuss books to my young daughter.

One of my favorites was Dr. Seuss's Sleep Book (1962). There isn't much of a story other than it is a long-running news report on various people and creatures going to sleep. As the "story" goes along, it keeps tallying up how many creatures are asleep. At the end, it includes the reader as part of the tally. I guess the idea is to make the reader sleepier as he reads it. The inside cover even states that, "This Book is to be Read in Bed." It is very entertaining.

Anyway, one report is on the infamous Zwieback Motel, whose beds are so uncomfortable that you really have to be tired to fall asleep there. It does not appear to be a very big hotel. It looks like it can hold about five customers (all of whom seem to be very blissfully sleeping according to the illustration). I thought that it would be fun to build a model of the hotel.


I am planning to build it in 1/300 scale. One of the problems is that building in Dr. Seuss' universe are not exactly symmetrical or rectilinear. Its going to be quite a challenge. Also, I have no idea what the hotel looks like from behind. I am going to use cardstock for the building and see where that goes. Currently, I am drawing up that plans on Adobe Illustrator. I will post updates as it progresses.

Tuesday, August 25, 2009

The New House on the Block

It took me awhile, but I finally finished this building:


It is a little more Mediterranean in style than my previous buildings. I got the inspiration from some "pretty pictures" site on the web. I am not crazy about the balcony on the third floor and I should have added a little more height to the top floor.

I have several building projects in mind, including a fuel storage facility, a market area, and something along the lines of Dr. Seuss!

Wednesday, April 22, 2009

A Room with a View

For my Gambusian campaign, I needed some buildings to represent larger urban areas. I still have not completely decided on what sort of architectural styles abound on the continent. I built this small building as a generic urban dwelling:


I built it out of Sculpy polymer clay and hence, it has a rather warped look. The windows are out of cardstock. Not the greatest building, but from a distance, it doesn’t look too horrible. The problem is that its sort of pain to cut the slabs of sculpy to make the walls of the buildings. Oh sure, they look nice initially, but when you even start to move them, the corners warp. It was also a lot of work to bevel the corners evenly to glue the corners together. So, I think this will be last of my 6mm sculpy buildings.

Recently, I ran across Matakishi's Tea House (http://www.matakishi.com). It is an excellent site where the author has a lot of how-to stuff. He is very good at going step-by-step in how things are done, which really helps a lot. One of his projects is a how-to on building generic Middle Eastern buildings. He even provides the plans. Here is my take on them:


These buildings are modified from his plans. His are for 28mm scale. Also, they are built so that you can stick your troops inside. So, there was a lot of reduction in size. I am never too good at getting my proportions right. I think my buildings suffer from scale creep. My trees seem to come out that way, too, but that is for another entry.

Here is the first one I made:


I used Adobe Illustrator to reduce the size, and to adjust for the fact that I won’t be putting figures inside the building. The windows and doors are made out of sculpy. There is some warping on some of the windows, but it’s minimal. Besides, we’re talking “developing nation” here. To get a sort of adobe effect on walls of this building and the following, I took craft paint and mixed it with some baking powder. It gave the rough texture. You need to paint fast because the baking powder dries the paint quickly.

This first apartment looks cool with the balcony wrapped around the two sides of the building, but it was very tricky to pull off. So, I got lazy and put the balcony only on side of the second building. Besides, the tenants pay lower rent at this apartment:


Again, same methods. I got a little fancier with the doors and even tried my hand at building a dormer for the top floor apartment.

The third building is more of a shop or restaurant:


The awning outside the shop is just a piece of paper held up by segments of wire. I didn’t intend for the building to be this dark a brown. It seemed to darken a little when I mixed it with the baking soda. The building’s walls look rougher than the others because I let the paint-baking soda mixture dry a little more before application, and I think I added more baking soda than on the other two. One nice thing is that the mixture also works as filler and can cover up some gaps between cardstock and can smooth out edges a little bit.